
Docker Container

Overview

The netboot.xyz docker image allows you to easily set up a local instance of netboot.xyz. The container is a small helper application written in node.js. It provides a simple web interface for editing menus on the fly, retrieving the latest menu release of netboot.xyz, and enables mirroring the downloadable assets from Github to your location machine for faster booting of assets.

netboot.xyz webapp

It is a great tool for developing and testing custom changes to the menus. If you have a machine without an optical drive that cannot boot from USB then having a local netboot server provides a way to install an OS. If you are looking to get started with netboot.xyz and don't want to manage iPXE menus, you should use the boot media instead of setting up a container.

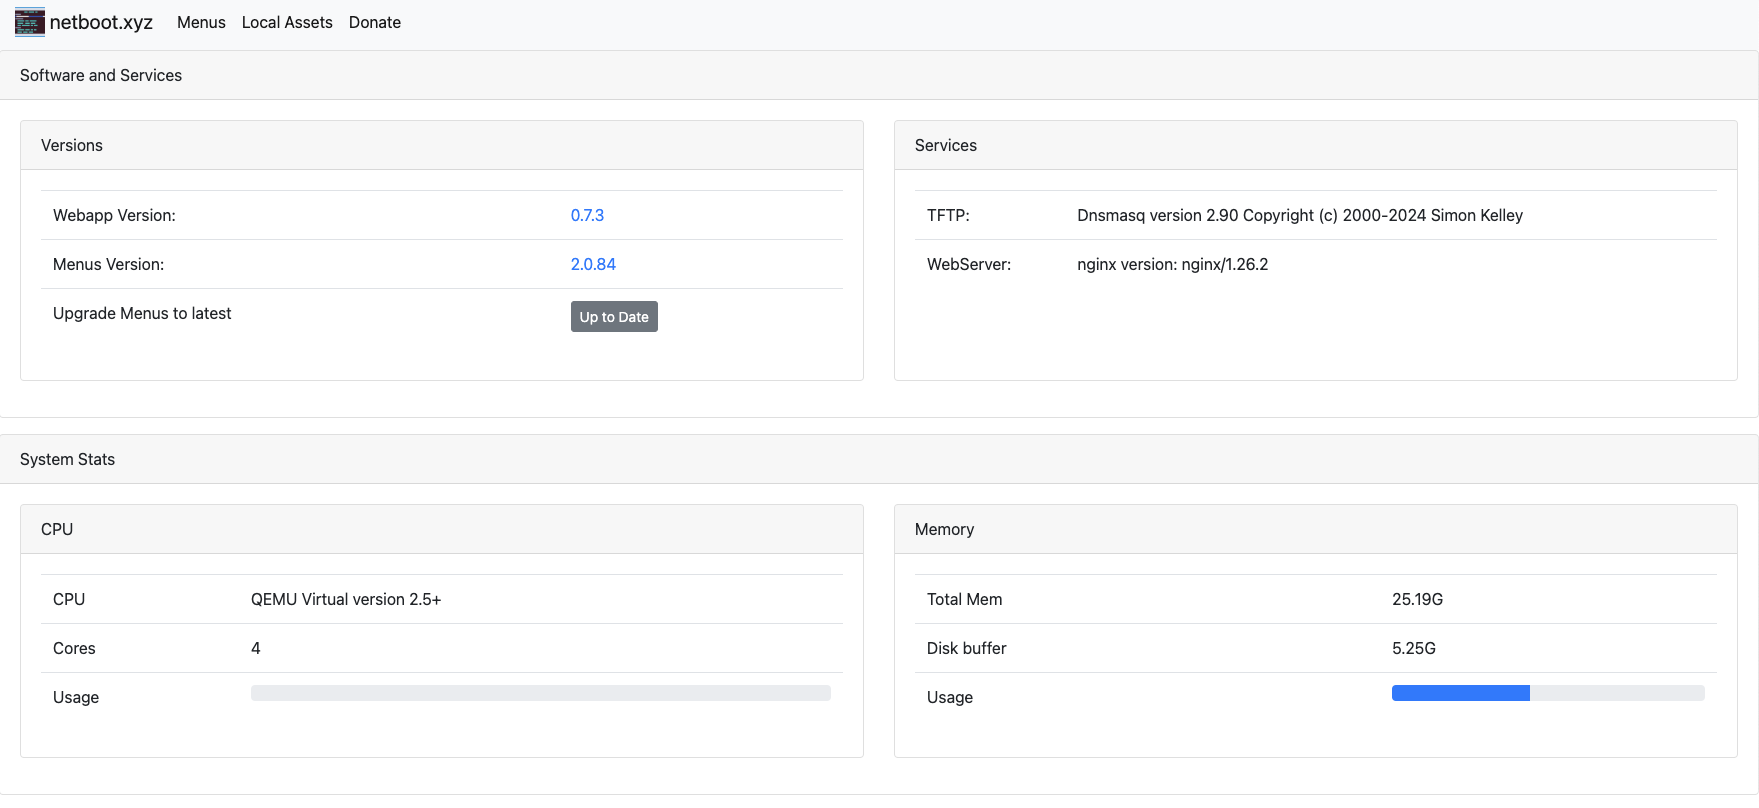
The container is built upon Alpine Linux and contains several components:

  • netboot.xyz webapp
  • Nginx for hosting local assets from the container
  • tftp-hpa
  • syslog for providing tftp activity logs

Services are managed in the container by supervisord.

The container runs fine under ARM-based hosts as well as x86-64.

Usage

The netboot.xyz docker image requires an existing DHCP server to be setup and running in order to boot from it. The image does not contain a DHCP server service. Please see the DHCP configuration setup near the end of this document for ideas on how to enable your environment to talk to the container. In most cases, you will need to specify the next-server and boot file name in the DHCP configuration. Your DHCP server will need to be assigned a static IP.

Installing docker

To install docker under Debian and Ubuntu run:

sudo apt install docker.io

Download the docker image

From Github Container Registry

docker pull ghcr.io/netbootxyz/netbootxyz

From Docker Hub

docker pull netbootxyz/netbootxyz

The following snippets are examples of starting up the container.

docker-cli

docker run -d \
  --name=netbootxyz \
  -e MENU_VERSION=2.0.76             `# optional` \
  -e NGINX_PORT=80                   `# optional` \
  -e WEB_APP_PORT=3000               `# optional` \
  -p 3000:3000                       `# sets web configuration interface port, destination should match ${WEB_APP_PORT} variable above.` \
  -p 69:69/udp                       `# sets tftp port` \
  -p 8080:80                         `# optional, destination should match ${NGINX_PORT} variable above.` \
  -v /local/path/to/config:/config   `# optional` \
  -v /local/path/to/assets:/assets   `# optional` \
  --restart unless-stopped \
  ghcr.io/netbootxyz/netbootxyz

Updating the image with docker-cli

docker pull ghcr.io/netbootxyz/netbootxyz   # pull the latest image down
docker stop netbootxyz                      # stop the existing container
docker rm netbootxyz                        # remove the image
docker run -d ...                           # previously ran start command

Start the container with the same parameters used above. If the same folders are used your settings will remain. If you want to start fresh, you can remove the paths and start over.

docker-compose

  1. Copy docker-compose.yml.example to docker-compose.yml
  2. Edit as needed
  3. Run docker-compose up -d netbootxyz to start containers in the background

Updating the image with docker-compose

docker-compose pull netbootxyz     # pull the latest image down
docker-compose up -d netbootxyz    # start containers in the background

Accessing the container services

Once the container is started, the netboot.xyz web application can be accessed by the web configuration interface at http://localhost:3000 or via the specified port.

Downloaded web assets will be available at http://localhost:8080 or the specified port. If you have specified the assets volume, the assets will be available at http://localhost:8080.

If you wish to start over from scratch, you can remove the local configuration folders and upon restart of the container, it will load the default configurations.

Local Mirror Access

If you want to pull the Live Images images down from your own mirror, modify the boot.cfg file and override the default live_endpoint setting from https://github.com/netbootxyz and set it to your deployment IP or domain, e.g. http://192.168.0.50:8080. It will then redirect asset download to the local location you set for assets on port 8080 and you can download the assets by using the local assets menu down to your local server. This can result in a much faster boot and load time.

Parameters

Container images are configured using parameters passed at runtime (such as those above). These parameters are separated by a colon and indicate <external>:<internal> respectively. For example, -p 8080:80 would expose port 80 from inside the container to be accessible from the host's IP on port 8080 outside the container.

ParameterFunction
-p 3000Web configuration interface.
-p 69/udpTFTP Port.
-p 80NGINX server for hosting assets.
-e WEB_APP_PORT=3000Specify a different port for the web configuration interface to listen on.
-e NGINX_PORT=80Specify a different port for NGINX service to listen on.
-e MENU_VERSION=2.0.76Specify a specific version of boot files you want to use from netboot.xyz (unset pulls latest)
-v /configStorage for boot menu files and web application config
-v /assetsStorage for netboot.xyz bootable assets (live CDs and other files)

DHCP Configurations

This image requires the usage of a DHCP server in order to function properly. If you have an existing DHCP server, usually you will need to make some small adjustments to make your DHCP server forward requests to the netboot.xyz container. You will need to typically set your next-server and boot-file-name parameters in the DHCP configuration. This tells DHCP to forward requests to the TFTP server and then select a boot file from the TFTP server.

Examples

These are a few configuration examples for setting up a DHCP server. The main configuration you will need to change are next-server and filename/boot-file-name. Next-server tells your client to check for a host running tftp and retrieve a boot file from there. Because the docker image is hosting a tftp server, the boot files are pulled from it and then it will attempt to load the iPXE configs directly from the host. You can then modify and adjust them to your needs. See booting from TFTP for more information.

isc-dhcp-server

To install the DHCP server under Debian and Ubuntu run:

sudo apt install isc-dhcp-server

You must edit two files to configure isc-dhcp-server. Edit /etc/default/isc-dhcp-server and configure at least one of the INTERFACES variables with the name of the interface you want to run the DHCP server on:

INTERFACESv4="eth0"

You'll also need a /etc/dhcp/dhcpd.conf looking something like this:

option arch code 93 = unsigned integer 16;

subnet 192.168.0.0 netmask 255.255.255.0 {
  range 192.168.0.34 192.168.0.254;       # Change this range as appropriate for your network
  next-server 192.168.0.33;               # Change this to the address of your DHCP server
  option subnet-mask 255.255.255.0;
  option routers 192.168.0.1;             # Change this to the address of your router
  option broadcast-address 192.168.0.255;
  option domain-name "mynetwork.lan";     # This is optional
  option domain-name-servers 1.1.1.1;
  if exists user-class and ( option user-class = "iPXE" ) {
    filename "http://boot.netboot.xyz/menu.ipxe";
  } elsif option arch = encode-int ( 16, 16 ) {
    filename "http://boot.netboot.xyz/ipxe/netboot.xyz.efi";
    option vendor-class-identifier "HTTPClient";
  } elsif option arch = 00:07 {
    filename "netboot.xyz.efi";
  } else {
    filename "netboot.xyz.kpxe";
  }
}

Now you can try starting the DHCP server:

sudo systemctl start isc-dhcp-server

To make the dhcp server start automatically on boot:

sudo systemctl enable isc-dhcp-server

netboot.xyz boot file types

The following bootfile names can be set as the boot file in the DHCP configuration. They are baked into the Docker image:

bootfile namedescription
netboot.xyz.kpxeLegacy DHCP boot image file, uses built-in iPXE NIC drivers
netboot.xyz-undionly.kpxeLegacy DHCP boot image file, use if you have NIC issues
netboot.xyz.efiUEFI boot image file, uses built-in UEFI NIC drivers
netboot.xyz-snp.efiUEFI w/ Simple Network Protocol, attempts to boot all net devices
netboot.xyz-snponly.efiUEFI w/ Simple Network Protocol, only boots from device chained from
netboot.xyz-arm64.efiDHCP EFI boot image file, uses built-in iPXE NIC drivers
netboot.xyz-arm64-snp.efiUEFI w/ Simple Network Protocol, attempts to boot all net devices
netboot.xyz-arm64-snponly.efiUEFI w/ Simple Network Protocol, only boots from device chained from
netboot.xyz-rpi4-snp.efiUEFI for Raspberry Pi 4, attempts to boot all net devices